Three's Blender exporter supports the export of other types of texture in addition to simple diffuse color textures. We will show how to use specular, ambient occlusion, and normal map textures in addition to the diffuse texture.
Diffuse textures specify the color across the model. Specular textures specify shininess, i.e. reflective highlights. Ambient occlusion textures specify the amount of ambient lighting, and allow crevices and corners to be darker than the rest of the model. Normal maps specify the angle of the surface and provide the illusion of finer scale shape variations than are represented in the actual faces of the model.
These additional texture types can add a lot, but where do you get them? The easiest way to get started is to use a tool that guesses the normal map, specular, and ambient occlusion textures from the diffuse texture. Of course, the diffuse texture does not contain enough information to guarantee the results; the software simply makes an intelligent guess based on the provided texture. Shader Map is one (Windows-only) tool that produces normal, specular and ambient occlusion maps from a normal texture.
The full version of Shader Map has a nice GUI and a free demo, but the full version is purchase only. However, you can do quite a lot using the free command line version. You should execute the following command after installing one time to configure shader map to export *.png image files.
shadermap fprop -norm (PNG24,_NORM) -spec (PNG24,_SPEC) -ambo (PNG24,_AMBO)
An example command line that generates all the basic maps is shadermap cdiff "C:\full\path\from\root\of\drive\mytexture.png" -v -norm (100,100,0,0) -spec (100,-20,60,0) -ambo (100,10,15,70,12,0,0).
If you don't want to experiment with texture generation tools right now, a set of pre-generated textures useful for testing is available here. The diffuse texture was used to generate the others via the command above. The orginal diffuse texture is from Mayang.com.

We will quickly create a simple cube, apply four textures to it, and visualize it using Three. Have your textures handy before starting. Follow all the instructions in the Basic Model Export test, except as noted below.
Instead of using the "Smart UV Project" unwrap method, simply choose "Unwrap" instead. This will result in having the complete texture mapped to each of the six sides of the cube.
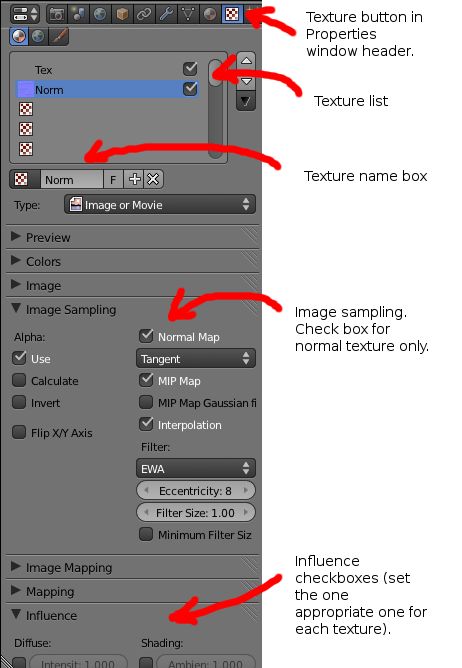
Instructions for applying each of the four textures is given below. Press the Textures context button in the Properties editor. There is a default texture named "Tex" already present. Delete it by pressing the X button below. For each texture type (diffuse, specular, ambient occlusion, and normal map) follow these steps.
Export and render the model as in the basic example.